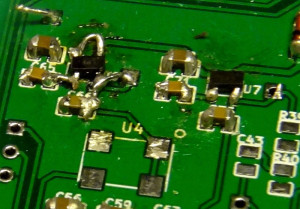
The CC1 build is back on track with the replacement U6 transistor and U4 oscillator.
I ended up completely mangling 3 out of the 5 pads that U6 is mounted on, so I had to do some creative/ugly jumpering between U6 and the components it connects to.
Pro tip: Before trying to remove a part, make sure all the solder is removed before pulling it off.

It’s supposed look like U7 on the right (maybe minus that big ball of solder on pin 4). Instead, I had to jumper across to C65 and C66 and connect pins 1 and 3 (normally connected by a trace under U6). The wire to the right connects Vout to the 3.3V test point. It looks ugly, but it works. Still getting 5V from U7, and 3.26V out of U6. For a while, I was getting a little worried that I had completely ruined things.
CC1 build is back on track. Next I need to wind some inductors for L12 and L13 to finish off the audio amp/mute stage.
Discover more from AB4UG Radioblog
Subscribe to get the latest posts sent to your email.