Well, mostly. Still not sure if it actually works yet.
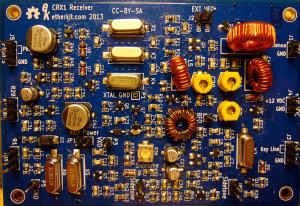
Finished soldering all the bits onto the CRX1 board. All I need to do now is figure out how I’m going to attach the connector plugs, BNC connector and the potentiometers.
Completed CRX1
Turned out to be a relatively easy build, Didn’t have any parts fly away and only soldered one component to the wrong spot (one of the inductors, so it was easy to fix).
I think attaching the external bits and figuring out if it all works or not willl have to wait until I get back from my Edmonton trip.
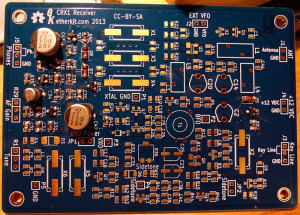
Made it up to the mixer stage of CRX1 tonight. The bandpass filter is the next section and has a couple of inductors, so I thought that would be a good stopping point.
CRX1 mixer
Also soldered on header pins for attaching the external bits. How I’m going to attach the external bits to the header pins, I’m not sure yet. I’ll have to try to find some header pin connectors from somewhere.
Applied 12V power to the board, and there was no smoke or flames, so I’ll take that as a good sign. Saw 11.8V – 11.9V at a few places on the board. so hopefully that’s another good sign.
Since it’s a kit using almost all surface mount components, assembling can seem a little daunting if all you’ve done so far is through-hole stuff. Jason offers up a good surface mount tutorial for beginners, and there are plenty of videos on YouTube to watch that will show you how to do surface mount work. It’s easier than it seems, but does require a little more care and attention to detail. Many people I’ve talked to seem to end up preferring it to through-hole stuff after a while.
I’m enjoying building mine so far. Don’t know if it works yet, but hopefully I haven’t done anything to mess it up.
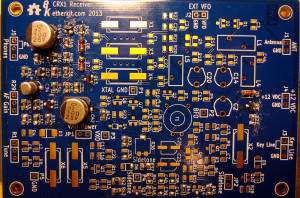
Made it up to the IF amplifier stage of the CRX1 build. Got a helpful critique of my soldering technique from Thomas/LA3PNA before I started working on it today, so hopefully the parts I did today look a little better. Made it up to the point where T1 gets attached before I decided to call it a day. Figured it was a good stopping point.
CRX1 IF amp
Still haven’t applied power yet so I don’t actually know how the assembly is going. I think once I get T1 put on, I’ll work on attaching the header pins so I can attach some of the external components. Then I can run through some of the tests.
Started soldering the bits onto the CRX1 circuit board. After going through and taking inventory of everything and noting where everything goes, it was time to heat up the soldering iron.
Here, the power conditioner (middle right) and audio amp (upper left) stages have been completed. Haven’t applied power to the board yet. One of the people assembling a beta kit used header pins and connectors for the external parts (like the power connector, pots, etc) so I think I’ll do the same. Then I won’t have to worry about soldering temporary wires when I get around to testing things.
CRX1 power and audio amp completed
I made it half way through the sidetone oscillator stage (lower middle) before I decided to call it quits for the night.
CRX1 sidetone oscillator section
Having everything on one side of the board definitely makes things a little easier. I don’t need to flip the board over, and the board lays flat on the table. The pieces are still pretty small, but with some more experience under my belt now, it’s not so bad. I’m starting to like working with SMT, although I haven’t quite decided if I prefer it over through hole.
While I was working, the lens from my magnifier light fell out. One of the clips had broken and the lens ended up falling out. Fortunately I wasn’t soldering at the time so it just fell into my lap and onto the ground. No breakage fortunately, but now I’ll have to figure out how to secure the lens with one of the clips missing.