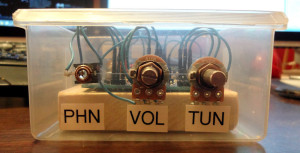
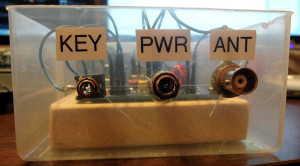
I thought the CRX1 fit pretty nicely in that parts bin, so I decided to make it into a container (can’t really call it an enclosure) for the board. It’s not an elegant enclosure like the kind Dave/AA7EE makes, but it works out pretty well, and shows off the board nicely. Maybe when I get some enclosure making skill levels, I’ll make a new one.
CRX1 container
I was originally going to get some standoffs to secure the board to the bin, but then I thought it might be nice for there to be a bit of weight so that it would sit a little more securely. I cut a piece of 1×3″ board to fit and screwed it to the bin, then screwed the CRX1 to the board.
CRX1 side
CRX1 side
Now I need to find some rubber feet for the bottom of the bin and some knobs for the gain and tuning pots.
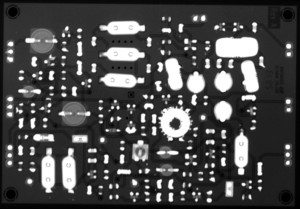
Took a radiograph of my CRX1 today. I used a magnification factor of somewhere between 1.8-2.0 so that the CRX1 would take up as much of an 18x24cm cassette as possible without introducing too much blurring. Acquired this image at 80 kVp, 8 mAs using the small focal spot.
I managed to make a short 2 minute recording of the audio output from my CRX1. I don’t know enough Morse code to copy what was going on, and it’s going too fast for me to copy anyway. Hopefully it gives you an idea of what the CRX1 sounds like.
I’m really enjoying the simplicity of this little receiver. Attach the antenna, connect a power source and you have two knobs to turn that tune and adjust volume.
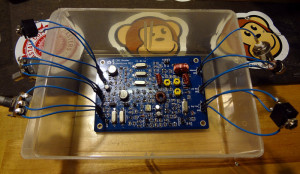
Assembling CRX1 was a lot of fun, and really didn’t take as long as I thought it would. Working on it a couple hours a day, it took me 4 days to finish. Don’t let the use of surface mount components scare you away from trying the kit out. As I’ve found out, working with SMD is actually pretty easy once you’ve got a few essential items.
Very happy to report that after eliminating the wall wart and connecting CRX1 to the ham shack power supply that everything works! I was able to hear a few CW QSOs happening yesterday morning and could tune around without any problems. Not entirely sure what frequencies I’m listening to though (somewhere between 7.030 and 7.034 MHz according to the specs).
Now the next step will be to figure out where to put the Astron power supply so that it doesn’t take up a huge amount of space on the workbench and so I can use it to power future experiments/builds. Might also be nice to have something like a RigRunner that’s fused and will let me connect multiple devices.
Fortunately Jason/NT7S and Thomas/LA3PNA happened to be around in the #etherkit IRC channel (irc.recursiv.com), and helped me do some troubleshooting. Ran through some simple tests with Thomas to verify that at least the sidetone, audio and muting sections were working. Added a jumper to JP2, which gave me a sidetone. Had I read the assembly docs closer, I’d have known that.
Jason provides voltages to look for on the transistors, so out came the DVM and I started poking around. Everything checked out ok, except I wasn’t getting voltage readings in the VXO section. Duh, I needed to add a jumper to JP1, which I also would have known had I read the assembly docs closer.
Once I did that and applied power again, I started hearing some noise and also caught a small bit of CW in the background. Success! The whine was still there though.
Jason suggested the wall wart as the source of the whine. Apparently wall warts are notorious for being noisy like that. I’ll need to make up a connector so I can use a battery or the radio power supply. Hopefully that will do the trick. Then I can go through the alignment process.
You know, this plastic parts bin could actually make kind of a neat container for CRX1. Punch a few holes for all the connectors/pots, and add some feet. That could work, right?
The wall wart is probably why the CC1 produced the same whine as well. I guess I’ll have to clear some space on the bench for that big old Astron power supply.