Very happy to report that after eliminating the wall wart and connecting CRX1 to the ham shack power supply that everything works! I was able to hear a few CW QSOs happening yesterday morning and could tune around without any problems. Not entirely sure what frequencies I’m listening to though (somewhere between 7.030 and 7.034 MHz according to the specs).
Now the next step will be to figure out where to put the Astron power supply so that it doesn’t take up a huge amount of space on the workbench and so I can use it to power future experiments/builds. Might also be nice to have something like a RigRunner that’s fused and will let me connect multiple devices.
Fortunately Jason/NT7S and Thomas/LA3PNA happened to be around in the #etherkit IRC channel (irc.recursiv.com), and helped me do some troubleshooting. Ran through some simple tests with Thomas to verify that at least the sidetone, audio and muting sections were working. Added a jumper to JP2, which gave me a sidetone. Had I read the assembly docs closer, I’d have known that.
Jason provides voltages to look for on the transistors, so out came the DVM and I started poking around. Everything checked out ok, except I wasn’t getting voltage readings in the VXO section. Duh, I needed to add a jumper to JP1, which I also would have known had I read the assembly docs closer.
Once I did that and applied power again, I started hearing some noise and also caught a small bit of CW in the background. Success! The whine was still there though.
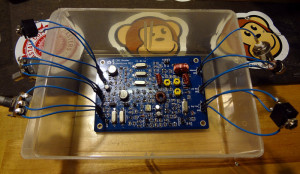
Jason suggested the wall wart as the source of the whine. Apparently wall warts are notorious for being noisy like that. I’ll need to make up a connector so I can use a battery or the radio power supply. Hopefully that will do the trick. Then I can go through the alignment process.
You know, this plastic parts bin could actually make kind of a neat container for CRX1. Punch a few holes for all the connectors/pots, and add some feet. That could work, right?
The wall wart is probably why the CC1 produced the same whine as well. I guess I’ll have to clear some space on the bench for that big old Astron power supply.
Saturday I played in the SC QSO party for a few hours. Started in the early afternoon and spent some time tuning around 10m, 15m and 20m listening for activity, but like the TN QSO party a couple weeks ago, the only place I was hearing any SC activity was on 40m.
Dropped down to 40m and started hearing a few stations here and there that I managed to get. Later on in the evening things started picking up and I was hearing a lot more SC stations. This QSO party marks the first time I found a frequency and called out CQ, rather than operating in seek and pounce mode (which I also did). Sitting on a frequency and calling out is a bit of a different experience. I didn’t get any pileups or anything, but did end up making 16 contacts over the course of an hour or so. It was pretty fun.
Ended up the day with 30 contacts in the log and got 11 SC counties, including AA4XX in 3 counties.
Had lots of fun playing radio over the weekend. Definitely need a more comfortable chair for the shack.
73 Magazine (also known as 73 Amateur Radio Today) (OCLC 22239204) was a United States-based amateur radio magazine that was published from 1960 to 2003. It was known for its strong emphasis on technical articles and for the lengthy editorials in each issue by its founder and publisher, Wayne Green. The magazine title, 73, means “best regards” in amateur radio lingo. Green, a former editor of CQ Amateur Radio magazine, published the first issue of 73 in October 1960.
Naturally, being a sucker for the old and vintage, such a huge magazine archive is like finding treasure. A bit of searching brought me to a Perl script someone had written to suck the PDFs of all the issues out of IA, so I let it run to chew up some bandwidth.
Looking forward to browsing through the archive. Should be pretty cool to read through.
Well, mostly. Still not sure if it actually works yet.
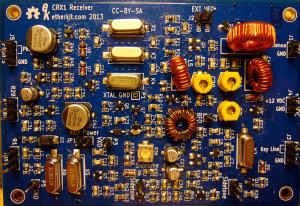
Finished soldering all the bits onto the CRX1 board. All I need to do now is figure out how I’m going to attach the connector plugs, BNC connector and the potentiometers.
Completed CRX1
Turned out to be a relatively easy build, Didn’t have any parts fly away and only soldered one component to the wrong spot (one of the inductors, so it was easy to fix).
I think attaching the external bits and figuring out if it all works or not willl have to wait until I get back from my Edmonton trip.