Since it’s a kit using almost all surface mount components, assembling can seem a little daunting if all you’ve done so far is through-hole stuff. Jason offers up a good surface mount tutorial for beginners, and there are plenty of videos on YouTube to watch that will show you how to do surface mount work. It’s easier than it seems, but does require a little more care and attention to detail. Many people I’ve talked to seem to end up preferring it to through-hole stuff after a while.
I’m enjoying building mine so far. Don’t know if it works yet, but hopefully I haven’t done anything to mess it up.
As a bit of a warm up for the SC QSO Party in a couple of weeks, I spent a few hours on the air yesterday playing in the Tennessee QSO Party.Started off slow, but then it started picking up late afternoon/early evening. Made 22 contacts in S&P (seek and pounce) mode tuning around 40m, including the K4TCG bonus station. Not a whole lot but I was content with it. According to N1MM, my score should be 620.
I wandered around 15m and 20m, but the only TNQP activity that I could hear was on 40m. Picked up plenty of rag chewing and nets on the other bands, but zero TNQP activity. I thought it was kind of odd, but maybe those signals were just skipping over me.
Logging was a little easier this time around because now I have a connection between the laptop and the radio, so N1MM is able to get the actual frequency from the radio instead of me having to go back and edit the contact afterwards.
Had fun making contacts. Looking forward to participating in the SCQP on the 21st. There were apparently no QSOs from Charleston County last year, so maybe that will make me a much sought after QSO.
I had 82 QSOs, lost one because I either heard or entered the call sign incorrectly, so a net of 81 QSOs counted for the contest. It’s too bad. The lost call was a multiplier for me too.
Two stations copied/entered my exchange incorrectly and one station copied/entered my call sign incorrectly, so I guess I wouldn’t have counted for their scores,
Final score ended up being 17520. Good enough to rank #54 in 4-land, #262 in North America, and #967 in the world. With the Rookie overlay, I ranked #6 in 4-land, #22 in North America, and #69 in the world. Not bad for only participating in it 12 out of 48 hours.
Fun contest to operate in. Looking forward to trying it out again next year.
Made it up to the IF amplifier stage of the CRX1 build. Got a helpful critique of my soldering technique from Thomas/LA3PNA before I started working on it today, so hopefully the parts I did today look a little better. Made it up to the point where T1 gets attached before I decided to call it a day. Figured it was a good stopping point.
CRX1 IF amp
Still haven’t applied power yet so I don’t actually know how the assembly is going. I think once I get T1 put on, I’ll work on attaching the header pins so I can attach some of the external components. Then I can run through some of the tests.
Started soldering the bits onto the CRX1 circuit board. After going through and taking inventory of everything and noting where everything goes, it was time to heat up the soldering iron.
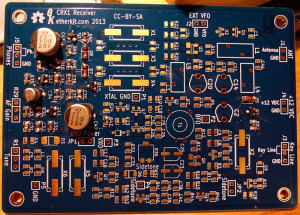
Here, the power conditioner (middle right) and audio amp (upper left) stages have been completed. Haven’t applied power to the board yet. One of the people assembling a beta kit used header pins and connectors for the external parts (like the power connector, pots, etc) so I think I’ll do the same. Then I won’t have to worry about soldering temporary wires when I get around to testing things.
CRX1 power and audio amp completed
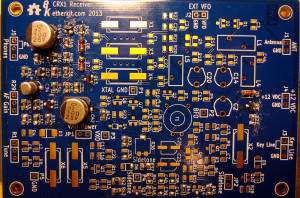
I made it half way through the sidetone oscillator stage (lower middle) before I decided to call it quits for the night.
CRX1 sidetone oscillator section
Having everything on one side of the board definitely makes things a little easier. I don’t need to flip the board over, and the board lays flat on the table. The pieces are still pretty small, but with some more experience under my belt now, it’s not so bad. I’m starting to like working with SMT, although I haven’t quite decided if I prefer it over through hole.
While I was working, the lens from my magnifier light fell out. One of the clips had broken and the lens ended up falling out. Fortunately I wasn’t soldering at the time so it just fell into my lap and onto the ground. No breakage fortunately, but now I’ll have to figure out how to secure the lens with one of the clips missing.